What is Web monitoring?

You can monitor the connection and collection status of the equipment remotely while data is collected via the Vital Recorder. This is done by uploading the data collected by the Vital Recorder to the server and then downloading it to the user's web browser. The flow chart of the data is as follows.
Medical devices→ Vital Recorder → Internet → Data server → Internet → Web browser
At this time, both the computer with the Vital Recorder and the computer with the Web browser must be connected to the Internet. Because web monitoring moves data out of the institution, its use may be restricted by law or regulation, depending on the country or region. Therefore, we recommend that you use Web monitoring for research purposes only. The data is permanently deleted after it has been temporarily stored on the server for 12 hours. Use local storage to record and archive research data.
Requirements
- Computer with Vital Recorder: To upload data, you need a computer with Vital Recorder installed and internet access.
- Web Browser: Web monitoring requires a computer with a web browser and Internet access. You can use Chrome, Edge, Firefox and Chromium-based browsers as your web browser, but we recommend using Chrome and mobile Chrome browsers.
Getting started
Vital Recorder Settings

- Press
 button on the Vital Recorder to open the “Settings” window.
 - Select "Enable Web Monitoring" from the “Management” section.
- VR code is a 9 digit random code consisting of numbers and characters. Record it or copy it by pressing the "Copy code" button.
- Press the "OK" button to exit the setting window.
Web Browser Settings
For remote monitoring through a web browser, you must be a member of VitalDB. If you have not signed up yet, please click the following link to accept the terms and complete your membership.
https://vitaldb.net/registration-agreement
After logging in, go to the Web monitoring page.
https://vitaldb.net/web-monitoring/

Click the "Register VR Code" button.\ Enter the pre-copied code in the pop-up window and click the "Register" button.

The web monitoring screen appears immediately if Vital Recorder is recording biosignals. The display of data may be delayed up to 5 seconds due to the time required for uploading and downloading.

You can add rooms as many as you would like to and monitor them at once like the image below.

Functions in Web Monitoring
Page Settings
There are useful functions that would improve your experience in Web Monitoring.
Let’s start with page settings.
The following image is the top part of the Web Monitoring page.

 button opens group list. When you select groups to filter from the list, only the beds of the groups are displayed on the page. Also, you can edit the group name from the list.
 filters the monitors connected to a patient. “4/129 beds” is a statistics showing the number of monitors connected to the patient in real time and the total number of monitors in the currently selected groups.
 button opens “Manage VR” on the left where you can manage all your VRs. The features in “Manage VR” will be covered in the next section.
 has options to choose the number of monitors displayed per line. For example, if you select 5, 5 monitors are listed per line as shown in the following image.

 is a page refresh button.
 is an expand button. When clicked, the page changes to full screen dark mode as shown in the following image.

Manage VR

 Click the button to open “Manage VR” on the left side of the page as shown in the picture above. In Manage VR, you can view and manage all VRs you have registered.
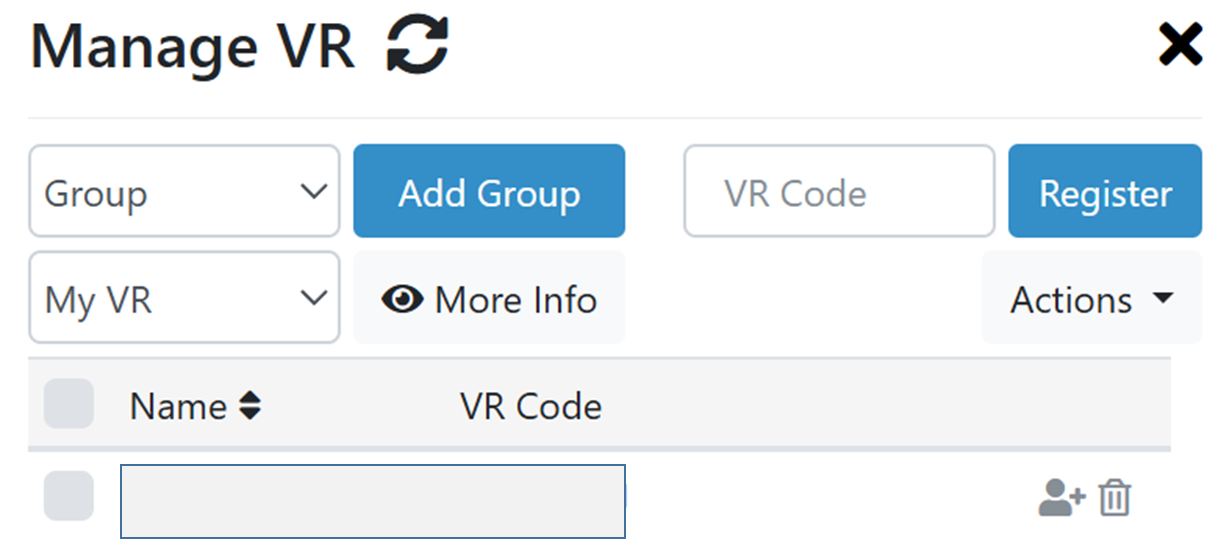

 Paste the pre-copied VR code and click the Register button to register a new VR
- To make a group, click the Add Group button, and name the group.
- For the VRs selected via checkboxes, you can perform four tasks using the
 : Change Group, Change Permission, Filter Settings, and Delete VR.
 - If you want to add a VR to a specific group, click the Change Group button and select a group that you would like to add it to.
- To give or change permissions to a VR, click the Change Permission button. You can grant one or more permissions (View, Download, Manage) by selecting the corresponding checkboxes. To specify who will receive access, enter the user IDs (separated by commas).
- To delete a VR, click the Delete VR button. You’ll be asked to type “delete” to confirm and avoid accidental deletion.
 buttons are used to control a VR individually.
 button makes the Change Permission window appear. Enter the User ID and check the permissions you want to grant.

- button is used to delete a VR. You’ll be asked to type “delete” to confirm.
Bed Monitor Settings

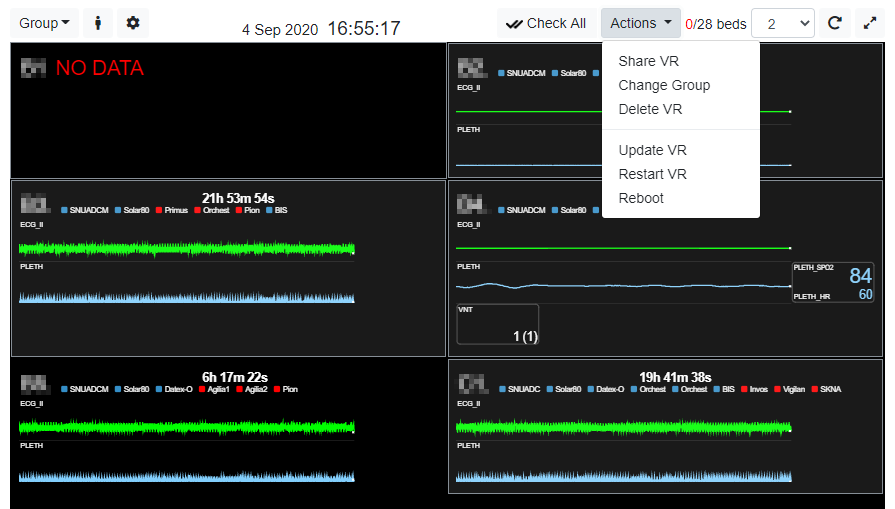
Right-click the monitor to open the room settings, and click elsewhere to close the settings.
- Upgrade VR can be executed as long as you have checked “Enable web configuration” from Vital Recorder Settings. It remotely updates Vital Recorder to the latest version.
- Change Permission is a function with which you can give permissions to view the monitor or download recorded files to other users, and where you can edit or delete permissions already granted.
- (Vital Recorder >= 1.8.8.9) With Device Settings, you can edit VR device lists remotely.

- (Vital Recorder >= 1.8.8.9) With Filter Settings, you can edit VR filter lists remotely.

- Restart VR, Reboot can be executed as long as you have checked “Enable web configuration” from Vital Recorder Settings. They each function as updating Vital Recorder, restarting Vital Recorder, and rebooting PC.
Multiple Monitor Settings
Full Screen Mode (Single Room Mode)
To zoom in on a monitor or to rewind the record of the latest 12 hours, Full Screen Mode must be selected. Double-click the monitor. Press ESC key or double-click the monitor to exit the mode.
The following image is an example of full screen mode.

- At the top center, the data recording time of the current case is displayed in red. In the example above, the case has been recorded for 21 minutes 5 seconds.
- You can view biosignal monitor of the desired time (up to 4 hours from now) with the slider at the bottom or buttons at the bottom:
- Press
 buttons to go back and forth by 7 seconds.
  to rewind to the beginning of the current case.
 goes back to the real time monitoring.
- When the past record is opened, the monitor will be paused and the pause button at the bottom left side becomes a play button. Press
 button to play the past record.